xPlora: Staircase Light
Introduction
A light switch makes our work easier. Lights on, Lights off. That is great! - but for a small room with one entrance. What about when you have two entrances, want to go up a flight of stairs or a long corridor. When you switch it on, you can only switch if off once you came back. But what if you come back after a long time?
To make this lighting setup more convenient and energy efficient, we will use two light switches. Sound confusing? it can be at first. This kind of light switch is called a two way switch. With a two way switch, you simply turn on the light, walk across the room and turn it off. For the staircase, you can turn on the light switch at the bottom and turn it off at the top.
Thus a two way switch allows you to control the light regardless of which switch you use - at either end of the corridor or at the top or bottom of the stair without needing to walk to a single switch or in the dark.
Things to learn
In this lesson, you will learn about:
- How a two way switch works
- How to connect a pushbutton two way switch
- How to build a staircase light
Build the project
In this section, we will build the two way switch circuit on our Unda.Xplora Breadboard.
Components
| Component | Description |
|---|---|
| 1 x WHITE LED |  |
| 1 x resistor (220 ohms) |  |
| 2 x resistor (1Okilo-ohm) |  |
| 2 x pushbutton |  |
| 4 x jumper wire |  |
| 3 x breadboarding jumper wire |  |
| 1 x battery connector |  |
| 1 x battery |  |
| 1 x Unda Xplora |  |
Step 1
Connecting the LED on the breadboard
- Step
- Build

- Placing the LED: Take the white LED from your Unda Xplora Kit. Identify the positive and negative pin of the LED; the positive pin has a longer leg than the negative pin. Place the LED on the breadboard with the negative leg of the LED placed on the negative bottom breadboard rail and the positive leg placed on the breadboard at pin b23.
- Placing the resistor: Take one 220 ohm resistor from the kit and connect it next to the positive leg of the LED from pin d23 to pin f23 of the breadboard.
- Connecting a jumper wire: Connect a jumper wire from digital pin D4 to the resistor at pin i23 of the breadboard.
Step 2
Connecting the pushbuttons on the breadboard
- Step
- Build

- Placing the pushbutton: Pick two pushbutton from your Unda Xplora components kit. There are five different colored pushbuttons available; choose the two that you prefer. For this project we will use the Black and Blue pushbutton.
- Take note of the pinouts: You should observe that the pushbutton has four pins, two on each side. The two pins on either side are internally connected which means that use just two pins of the four pins that are not internally connected can be used.
- Connecting Pushbutton1: Connect the two top pins of the pushbutton1 at pins g12 and g14 of the breadboard and then connect the other two pins of the pushbutton at pins d12 and d14 of the breadboard.
- Connecting Pushbutton2: Connect the two top pins of the pushbutton2 at pins g3 and g5 of the breadboard and then connect the other two pins of the pushbutton at pins d3 and d5 of the breadboard.
Step 3
Connecting resistors next to the pushbuttons
- Step
- Build

- Placing the resistor1: Pick one 10 Kilo Ohm resistor from your Unda Xplora components kit. Place one leg of the resistor next to one bottom pin of the pushbutton at pin b14 of the breadboard and place the other leg at the negative terminal of the bottom negative breadboard rail.
- Placing the resistor2: Pick another 10 Kilo Ohm resistor from your Unda Xplora components kit. Place one leg of the resistor next to one bottom pin of the pushbutton at pin b5 of the breadboard and place the other leg at the negative terminal of the bottom negative breadboard rail .
Step 4
Connecting the pushbuttons to 5V Power
- Step
- Build

- Connecting to breadboard positive rail: Using one breadboarding jumper wire, connect from any 5V pin of the kit to the top positive breadboard rail .
- Connecting to pushbutton1: Take another breadboarding jumper wire and connect from the top positive breadboard rail to one pin of the pushbutton at pin i12 of the breadboard. Remember that you can connect from any pin of the positive breadboard rail as long as the other pin of the breadboarding jumper wire is connected to pin i12 of the breadboard.
- Connecting to pushbutton2: Take another breadboarding jumper wire and connect from the top positive breadboard rail to one pin of the pushbutton at pin i3 of the breadboard. Remember that you can connect from any pin of the positive breadboard rail as long as the other pin of the breadboarding jumper wire is connected to pin i3 of the breadboard.
Step 5
Connecting to the pushbuttons output
- Step
- Build

- Connecting Jumper Wire 1: Using a jumper wire(pick any color of your choice), connect from digital pin D10 to one side of the pushbutton at pin i14 of the breadoard. Remember to ensure that one end of the jumper wire is placed in D10 and the other has been placed correctly at pin i14 of the breadboard.
- Connecting Jumper Wire 2: Using a jumper wire(pick any color of your choice), connect from digital pin D12 to one side of the pushbutton at pin i5 of the breadoard. Remember to ensure that one end of the jumper wire is placed in D12 and the other has been placed correctly at pin i5 of the breadboard.
Step 6
Connecting to Ground
- Step
- Build

- Connecting to GND: Using a jumper wire (pick any color of your choice), connect from GND pin of the Kit to the bottom breadboard negative rail . There are four GND pins on the kit and you can always connect from any one of them as long as the other pin of the GND is placed at the bottom breadboard negative rail.
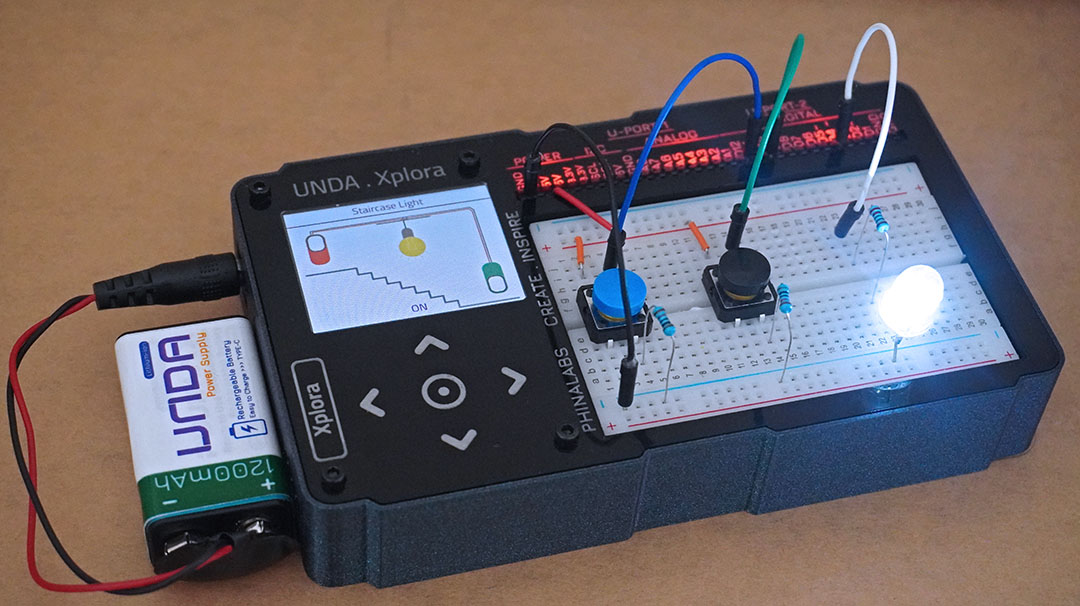
Run the Project
After you are done building the project, connect the battery to the battery connector and then plug it to the power port of your UNDA.Xplora to power it on.
Follow the steps below to load up the Staircase Light Project
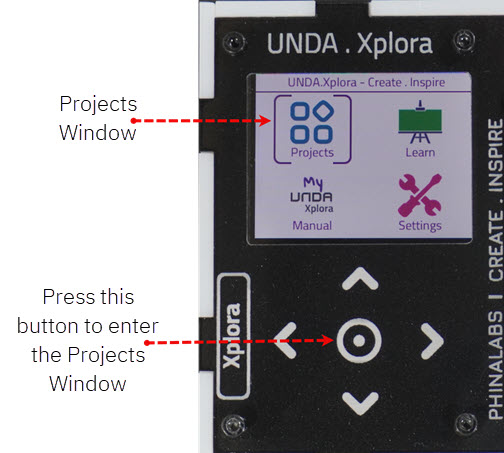
Open Project
From the main window open the projects