xPlora: Getting Started

Introduction
Unda.Adventure is a Montessor-inspired kit that has been developed for kids preschooler. The kit is designed with hands-on activities that target to nurture concentration, sensory development and love for exploration. The kit has also been designed as child-friendly introduction into STEAM - with a special focus on digital electroncis and thus laying the foundation for creativity and inspiring innovation in the years to come.
The kit has been designed to encourage the following:
- Engage Sensory Exploration: It is designed to encourage kids to actively explore their environment and in turn refines their sense of touch, sight and hearing - all while having fun!
- Nurturing Focus and Self motivation : It is desgned to encourage lkids to work on activities on their own and develop focus and concentration.
- Encourages Independent Learning: The kit has been designed to encourage the kits to activiely explore on their own which fosters self-paced learning through discovery.
- Sparking curiosity about STEAM: The kit has been curated to introduce foundational ideas and principles of STEAM in a fun and hands-on manner.
Its' built for pre schoolers, parents and makers of all ages and the the step by step documentation makes it easier the learning curve easier.
Overview
Unda Adventure consists of 6 different sections:
- Slide and Glow
- Music Boombox
- Flipflow
- Press and Play
- Blink Gauge
- Pixel Play
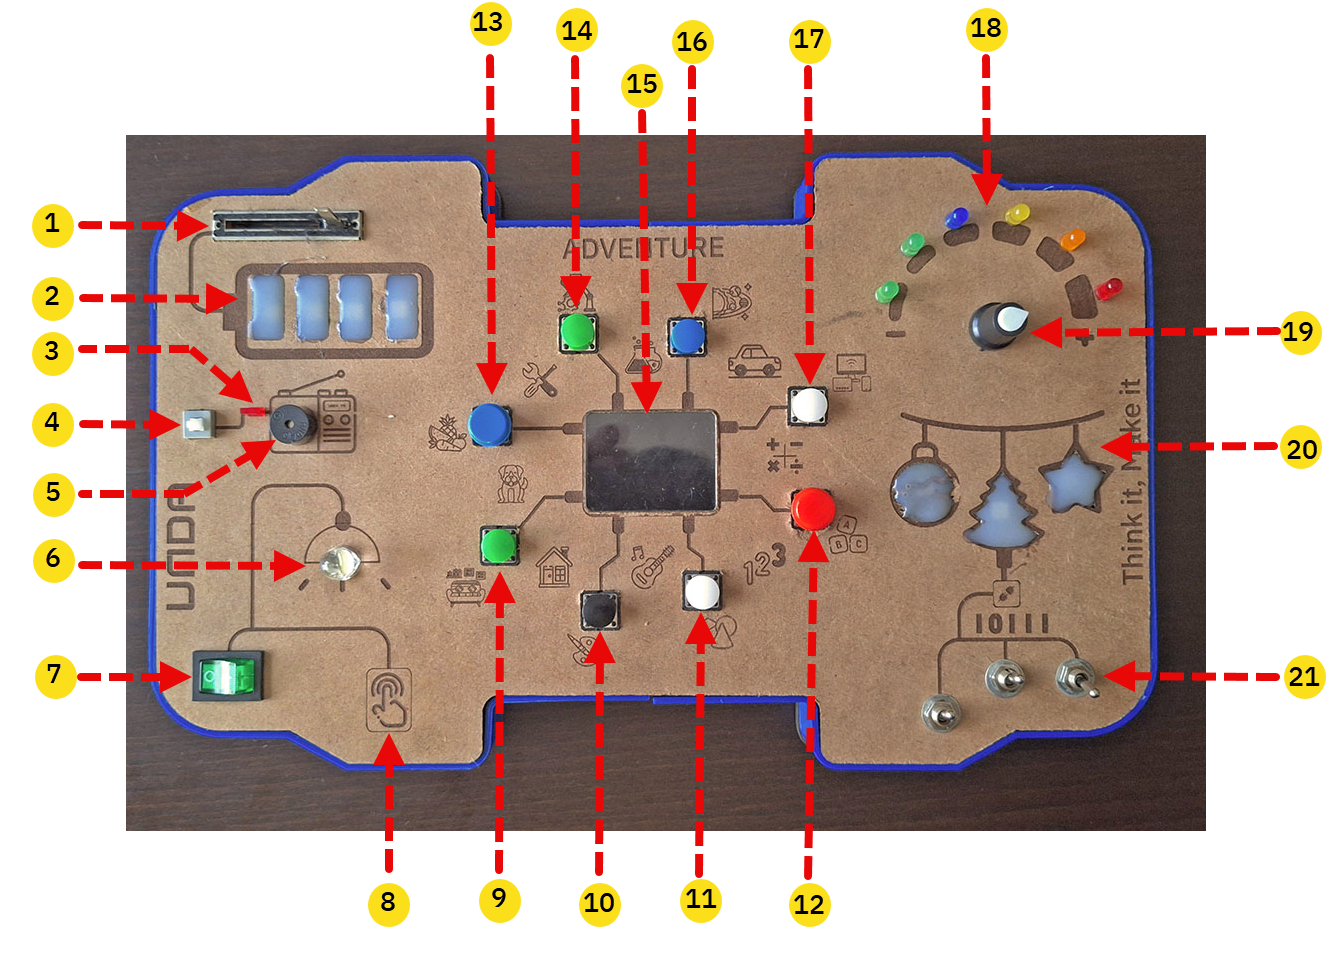
The sections are further described below.
Slide and Glow
This section consists of LEDs and a slider potentiometer arranged to form a battery-level visualizer.

| Feature | Component Name | Description |
|---|---|---|
| 1 | Slider Potentiometer | This is an electronic component that lets you control the level of things like volume or brightness by sliding the lever side to side. |
| 2 | Battery LED Visualizer | The visualizer is made up of a series of multi-colored LEDS that create diffferent color patterns. |
How does the Slide and Glow section work?
As the slider moves in one direction, the LEDs light up progressively from start to end, creating the effect of rising levels. When the slider is moved back, the LEDs turn off in reverse order. On sliding again, the LEDs light up once more, but this time in a different color, adding a dynamic and visually engaging effect that changes with each pass. This activity supports the development of fine motor skills as children use their fingers to control the slider and develops sight by allowing them to observe different color patterns.
Music Boombox
This section features the latch switch, LEDs, and buzzer arranged within a design resembling a music boombox, with each component placed in a specific zone.
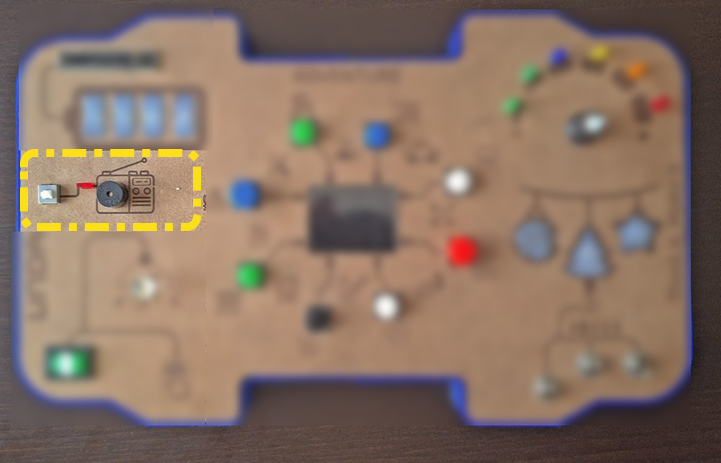
| Feature | Component Name | Description |
|---|---|---|
| 3 | Red-Colored LED | This is a Red sinle-colored LED and thus it only emits red colour when powered on. |
| 4 | Latch Switch | This is a type of switch that maintains its position when pressed unless it's pressed again i.e it remains on when turned on until it is pressed again is when it goes to the off position. |
| 5 | Buzzer | An electronic device that produces a sound when powered, typically used for signaling, alarms, or notifications in electronic systems. |
How does the Music Boombox section work?
This section works by first pressing the latch switch to the on position which turns on both the buzzer and the LED. When the buzzer turns on, it begins playing the tune of familiar children's play song say for example "Twinkle, Little Star". The LED on the other hand, also flash on and off in sync with the current tune being layed by the buzzer. Pressing the latch switch again , turn both the LED and buzzer of. When pressed again, this time the tone played by the buzzer is different from the first and also the LED flashes in sync depending with the current tone being played.
Pressing the switch each time will play a different song, and the LED will flash to match the new tune.The section helps enhance children’s sense of hearing by exposing them to educative children's tunes. It also supports the development of motor skills as they interact with the components, promoting hand-eye coordination and fine motor control.
Flipflow

The Flipflow section features a rocker switch, white -led and a touch switch that have been connected in a manner to mimic a two - way switch.
What is a two-way Switch?
This is an electrical connection of two different switches, that allows the user to control light fixtures such as bulbs from two different locations. The common applications include in Staircase Lighting, long corridors or large rooms.
| Feature | Component Name | Description |
|---|---|---|
| 6 | White-Colored LED | This is a white-colored LED and thus it only emits white colour when powered on. |
| 7 | Rocker Switch | This is a type of switch that operates by titling its lever into either on or off position.It has two marks; 0 to mean off and 1 to mean On position. |
| 8 | Touch Switch | A smart switch that is operated by a light touch. It is mostly designed for use in smart home automation. |
How does the FlipFlow Section Work?
There are three different types of operations for this section:
1.Rocker Switch Operation - When you press this switch to the on position (Flip it to the side marked with 1), the white LED turns on. The LED will only turn off when you flip the switch to the off position again. This works just like a single switch.
2.Touch Switch Operation - When the LED is off and you lightly tap on the Touch Switch, the LED turns on. Tapping the touch switch again will turn the LED off working like a single switch.
3.Combination Control - This now combines both the rocker and touch switch. Suppose the LED is off and you flip the rocker switch to turn it on, the LED turns on. You can lightly tap on the touch switch to turn it off which shows the concept of a two-way switch. The LED has been turned on and off using two different switches.
The Combination Control Challenge
Can you turn the LED on using the touch switch and off using the rocker switch?
Press and Play
This interactive section features a display and 8 pushbuttons, each connected to a specific theme. Each press on a different button will unlock a world of engaging experiences.
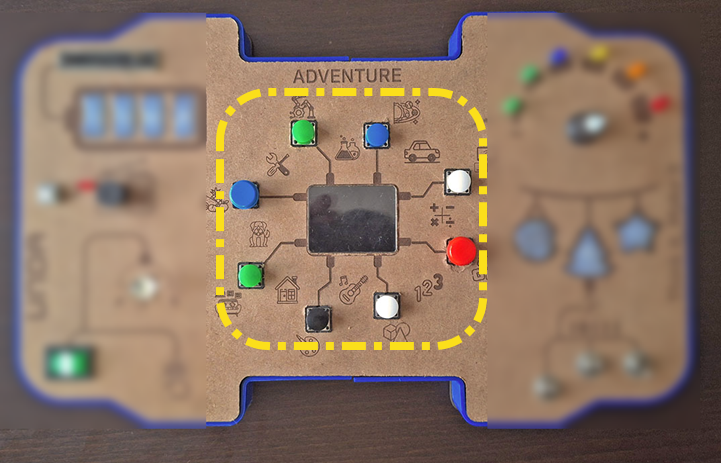
| Feature | Component Name | Description |
|---|---|---|
| 9 | Pushbutton 1 | When this button is pressed the display shows images or animation related to art and creativity. |
| 10 | Pushbutton 2 | This button is dedicated to displaying shapes and numbers when pressed. |
| 11 | Pushbutton 3 | It displays the 26 letters of the Alphabet on the display once pressed |
| 12 | Pushbutton 4 | When pressed, the display shows images or animations related to various technologies, scientific breakthroughs, and innovations. |
| 13 | Pushbutton 5 | This button is dedicated to displaying facts, concepts, and visualizations about different areas of science. |
| 14 | Pushbutton 6 | Pressing this button shows content related to various different engineering disciplines. |
| 15 | Display | It serves as an avenue that shows information, images or animations in visible format. |
| 16 | Pushbutton 7 | This button displays images or information about various fruits, vegetables, and plants,plant parts etc. |
| 17 | Pushbutton 8 | This button presents a wide variety of home elements and furnishings - from decorative items to different types of furniture. |
How does the Press and Play Section Work?
This section works by displaying a dfferent image, animation or video related to a specific theme that a pushbutton has been set to display.
Suppose button 1 is pressed, the diplay will show either an image, video, or animation related to creativity and art such as a paint brush. When pressed again, it changes to display a different image for example that of the colour red.
Pressing a different button each time will result in different images/video or animation that target a specific area in STEAM.
This sections has been created in such a way to enable the child to exlore different subjects in a fun and interactive way. It is aimed at equiping the child in knowledge of areas such as Science, Technology, Maths(Shapes, Numbers) etc targetting the five areas of STEAM.
Blink Gauge
This section feature 6 single-colored LEDS arranged in a semi-circular manner and a rotary potentiometer.

| Feature | Component Name | Description |
|---|---|---|
| 18 | 6 Single - Colored LED | These are single-colored LED and thus they only emits one colour when they are powered on. |
| 19 | Rotary Potentiometer | This is an electronic component that controls the level of things like volume or brightness by turning or rotating its knob. |
How does the Blink Gauge Section Work?
As you rotate the potentiometer, the LEDs begin to light up in sequence. Initially, only LED 1(green LED) is turned on and it blinks rapidly. As you continue to rotate the potentiometer, LED 1 will stops blinking but it remains turned on, while LED 2 starts blinking. This sequence continues with each LED stopping its blinking pattern and remaining on once the next one starts blinking.
The final state shows when all LEDs except the last one are turned on (LED 6), while LED 6 blinks rapidly to indicate that this is the maximum setting.
Where have you ever seen such a pattern?
Pixel Play
This section features three different toggle switches that have been connected to a multi-colored Chistmas decoration LED display.
| Feature | Component Name | Description |
|---|---|---|
| 20 | Christmas Decorations LEDS | These are multi-colored LEDS that have been arranged in a format mimicking christmas decorations. |
| 21 | 3 Toggle Switches | This is an electrical switch that can be turned on or off by flipping or sliding the lever in either positions. Fliping upwards means on while flipping downwards means off. |
How does the Pixel Play Section Work?
This section works with the LED diplay featuring different patterns and colors depending on the position of the toggle switches. Toggle switches have only two position; it can either be on or off. Combining their positions resulsts in different patterns and colors. For instance, when toggle 1 and 2 are turned off, but toggle 3 is on, a unique pattern of the LEDs emerges. When you turn toggle 1 and 3 on , another pattern and color emerges different from the first one. This is an engaging and interactive activity that peaks children's interest and exploration since each combination has its own pattern.
Pixel Play Challenge!
Which combination of the toggle switches turns the LEDs off?
How many different patterns have you noticed?